

Windows Server 2016 Iis Windows Authentication
This browser is no longer supported.
Upgrade to Microsoft Edge to take reward of the latest features, security updates, and technical support.
Windows Hallmark <windowsAuthentication>
Overview
The <windowsAuthentication> chemical element defines configuration settings for the Internet Information Services (IIS) 7 Windows hallmark module. You can utilize Windows authentication when your IIS 7 server runs on a corporate network that is using Microsoft Active Directory service domain identities or other Windows accounts to place users. Because of this, you lot tin use Windows authentication whether or not your server is a member of an Active Directory domain.
Windows authentication (formerly named NTLM, and also referred to every bit Windows NT Claiming/Response authentication) is a secure form of authentication considering the user name and password are hashed before being sent across the network. When you enable Windows authentication, the client browser sends a strongly hashed version of the password in a cryptographic substitution with your Spider web server.
Windows authentication supports 2 hallmark protocols, Kerberos and NTLM, which are defined in the <providers> element. When you install and enable Windows authentication on IIS seven, the default protocol is Kerberos. The <windowsAuthentication> element can also incorporate a useKernelMode attribute that configures whether to use the kernel manner authentication feature that is new to Windows Server 2008.
Windows authentication is best suited for an intranet environment for the following reasons:
- Client computers and Web servers are in the aforementioned domain.
- Administrators can brand sure that every client browser is Internet Explorer two.0 or later.
- HTTP proxy connections, which are not supported past NTLM, are not required.
- Kerberos version 5 requires a connection to Active Directory, which is not viable in an Internet environment.
New in IIS 7.five
The <extendedProtection> element was introduced in IIS 7.5, which allows yous to configure the settings for the new extended protection features that have been integrated into Windows authentication.
Compatibility
| Version | Notes |
|---|---|
| IIS x.0 | The <windowsAuthentication> element was not modified in IIS x.0. |
| IIS viii.5 | The <windowsAuthentication> element was not modified in IIS 8.5. |
| IIS 8.0 | The <windowsAuthentication> element was not modified in IIS 8.0. |
| IIS 7.5 | The <extendedProtection> element was added in IIS 7.5. |
| IIS 7.0 | The <windowsAuthentication> chemical element was introduced in IIS 7.0. |
| IIS 6.0 | The <windowsAuthentication> element replaces portions of the IIS 6.0 AuthType and AuthFlags metabase properties. |
Setup
The default installation of IIS vii and later does not include the Windows authentication function service. To use Windows hallmark on IIS, you lot must install the role service, disable Bearding authentication for your Web site or application, and then enable Windows authentication for the site or application.
Notation
After you install the function service, IIS 7 commits the following configuration settings to the ApplicationHost.config file.
<windowsAuthentication enabled="imitation" /> Windows Server 2012 or Windows Server 2012 R2
- On the taskbar, click Server Manager.
- In Server Manager, click the Manage menu, and so click Add Roles and Features.
- In the Add Roles and Features sorcerer, click Next. Select the installation blazon and click Adjacent. Select the destination server and click Next.
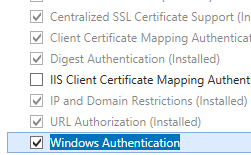
- On the Server Roles page, expand Web Server (IIS), expand Web Server, expand Security, and so select Windows Authentication. Click Next.
 .
. - On the Select features page, click Adjacent.
- On the Confirm installation selections page, click Install.
- On the Results page, click Close.
Windows viii or Windows 8.one
- On the Offset screen, move the pointer all the way to the lower left corner, right-click the Start push button, and so click Control Panel.
- In Command Panel, click Programs and Features, and so click Plow Windows features on or off.
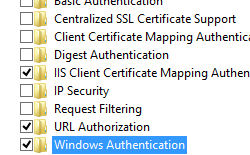
- Expand Internet Information Services, expand World Wide Spider web Services, aggrandize Security, and and so select Windows Authentication.
- Click OK.
- Click Close.
Windows Server 2008 or Windows Server 2008 R2
- On the taskbar, click Start, point to Authoritative Tools, and and then click Server Manager.
- In the Server Manager hierarchy pane, aggrandize Roles, and then click Web Server (IIS).
- In the Web Server (IIS) pane, scroll to the Role Services section, and then click Add Role Services.
- On the Select Function Services page of the Add together Office Services Sorcerer, select Windows Authentication, and then click Next.

- On the Confirm Installation Selections page, click Install.
- On the Results page, click Close.
Windows Vista or Windows 7
- On the taskbar, click Beginning, and and so click Control Panel.
- In Control Panel, click Programs and Features, and then click Turn Windows Features on or off.
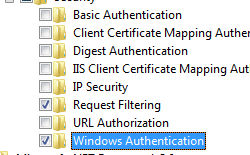
- Expand Cyberspace Information Services, then World Wide Web Services, then Security.
- Select Windows Authentication, and then click OK.
How To
How to enable Windows authentication for a Web site, Web awarding, or Web service
-
Open Internet Information Services (IIS) Manager:
-
If yous are using Windows Server 2012 or Windows Server 2012 R2:
- On the taskbar, click Server Manager, click Tools, and then click Internet Data Services (IIS) Manager.
-
If y'all are using Windows 8 or Windows 8.1:
- Concur down the Windows key, printing the letter X, and then click Control Panel.
- Click Administrative Tools, so double-click Internet Information Services (IIS) Managing director.
-
If you are using Windows Server 2008 or Windows Server 2008 R2:
- On the taskbar, click Outset, point to Authoritative Tools, and then click Net Information Services (IIS) Managing director.
-
If you are using Windows Vista or Windows 7:
- On the taskbar, click Offset, then click Control Panel.
- Double-click Administrative Tools, and then double-click Cyberspace Information Services (IIS) Manager.
-
-
In the Connections pane, expand the server name, expand Sites, and so the site, application, or Web service for which you want to enable Windows authentication.
-
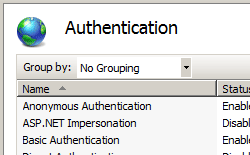
Scroll to the Security department in the Home pane, and and then double-click Authentication.
-
In the Authentication pane, select Windows Authentication, so click Enable in the Actions pane.
How to enable Extended Protection for Windows authentication
-
Open Net Data Services (IIS) Manager:
-
If y'all are using Windows Server 2012 or Windows Server 2012 R2:
- On the taskbar, click Server Manager, click Tools, so click Internet Data Services (IIS) Manager.
-
If y'all are using Windows viii or Windows 8.1:
- Hold down the Windows key, press the letter 10, and then click Control Console.
- Click Administrative Tools, and then double-click Internet Information Services (IIS) Manager.
-
If you are using Windows Server 2008 or Windows Server 2008 R2:
- On the taskbar, click Start, point to Authoritative Tools, so click Net Information Services (IIS) Manager.
-
If you are using Windows Vista or Windows 7:
- On the taskbar, click Showtime, and and then click Command Console.
- Double-click Authoritative Tools, and then double-click Internet Data Services (IIS) Manager.
-
-
In the Connections pane, expand the server name, aggrandize Sites, and and then the site, awarding, or Web service for which yous want to enable Extended Protection for Windows hallmark.
-
Gyre to the Security section in the Home pane, then double-click Authentication.
-
In the Authentication pane, select Windows Hallmark.
-
Click Enable in the Actions pane.

-
Click Advanced Settings in the Actions pane.
-
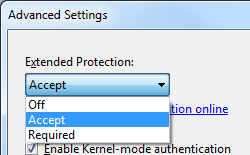
When the Avant-garde Settings dialog box appears, select one of the following options in the Extended Protection drib-down menu:
- Select Accept if yous want to enable extended protection while providing down-level support for clients that do not back up extended protection.
- Select Required if you want to enable extended protection without providing downwardly-level support.
-
Click OK to shut the Avant-garde Settings dialog box.
Configuration
The <windowsAuthentication> element is configurable at the site, application, or virtual directory level in the ApplicationHost.config file.
Attributes
| Attribute | Description |
|---|---|
authPersistNonNTLM | Optional Boolean attribute. Specifies whether IIS automatically reauthenticates every non-NTLM (for case, Kerberos) request, even those on the aforementioned connexion. False enables multiple authentications for the same connections. Note: A setting of true means that the client volition be authenticated only in one case on the same connection. IIS will cache a token or ticket on the server for a TCP session that stays established. The default is |
authPersistSingleRequest | Optional Boolean attribute. Setting this flag to truthful specifies that authentication persists only for a single request on a connection. IIS resets the authentication at the end of each request, and forces reauthentication on the next request of the session. The default value is |
enabled | Required Boolean aspect. Specifies whether Windows authentication is enabled. The default value is |
useKernelMode | Optional Boolean aspect. Specifies whether Windows hallmark is washed in kernel way. True specifies that Windows hallmark uses kernel manner. Kernel-mode authentication may improve authentication performance and prevent authentication problems with application pools that are configured to use a custom identity. As a best do, do non disable this setting if y'all use Kerberos authentication and have a custom identity on the application puddle. The default is |
Kid Elements
| Element | Clarification |
|---|---|
extendedProtection | Optional element. Specifies extended protection options for Windows authentication. Note: This element was added in IIS vii.5. |
providers | Optional element. Specifies security support providers used for Windows authentication. |
Configuration Sample
The post-obit default <windowsAuthentication> element is configured at the root ApplicationHost.config file in IIS 7.0, and disables Windows hallmark past default. It also defines the two Windows hallmark providers for IIS 7.0.
<windowsAuthentication enabled="false"> <providers> <add value="Negotiate" /> <add value="NTLM" /> </providers> </windowsAuthentication> The following example enables Windows authentication and disables Anonymous hallmark for a Spider web site named Contoso.
<location path="Contoso"> <system.webServer> <security> <authentication> <anonymousAuthentication enabled="fake" /> <windowsAuthentication enabled="true" /> </authentication> </security> </organization.webServer> </location> Sample Lawmaking
The following examples disable Anonymous authentication for a site named Contoso, so enable Windows authentication for the site.
AppCmd.exe
appcmd.exe set config "Contoso" -department:system.webServer/security/authentication/anonymousAuthentication /enabled:"False" /commit:apphost appcmd.exe set config "Contoso" -department:system.webServer/security/authentication/windowsAuthentication /enabled:"True" /commit:apphost Note
You lot must be sure to set the commit parameter to apphost when you use AppCmd.exe to configure these settings. This commits the configuration settings to the appropriate location section in the ApplicationHost.config file.
C#
using Organization; using Arrangement.Text; using Microsoft.Web.Administration; internal static class Sample { private static void Master() { using(ServerManager serverManager = new ServerManager()) { Configuration config = serverManager.GetApplicationHostConfiguration(); ConfigurationSection anonymousAuthenticationSection = config.GetSection("system.webServer/security/hallmark/anonymousAuthentication", "Contoso"); anonymousAuthenticationSection["enabled"] = false; ConfigurationSection windowsAuthenticationSection = config.GetSection("organisation.webServer/security/authentication/windowsAuthentication", "Contoso"); windowsAuthenticationSection["enabled"] = true; serverManager.CommitChanges(); } } } VB.NET
Imports System Imports System.Text Imports Microsoft.Spider web.Administration Module Sample Sub Master() Dim serverManager Equally ServerManager = New ServerManager Dim config As Configuration = serverManager.GetApplicationHostConfiguration Dim anonymousAuthenticationSection As ConfigurationSection = config.GetSection("system.webServer/security/authentication/anonymousAuthentication", "Contoso") anonymousAuthenticationSection("enabled") = Imitation Dim windowsAuthenticationSection As ConfigurationSection = config.GetSection("system.webServer/security/hallmark/windowsAuthentication", "Contoso") windowsAuthenticationSection("enabled") = Truthful serverManager.CommitChanges() Terminate Sub End Module JavaScript
var adminManager = new ActiveXObject('Microsoft.ApplicationHost.WritableAdminManager'); adminManager.CommitPath = "Machine/WEBROOT/APPHOST"; var anonymousAuthenticationSection = adminManager.GetAdminSection("system.webServer/security/hallmark/anonymousAuthentication", "MACHINE/WEBROOT/APPHOST/Contoso"); anonymousAuthenticationSection.Properties.Item("enabled").Value = false; var windowsAuthenticationSection = adminManager.GetAdminSection("system.webServer/security/authentication/windowsAuthentication", "Automobile/WEBROOT/APPHOST/Contoso"); windowsAuthenticationSection.Properties.Particular("enabled").Value = true; adminManager.CommitChanges(); VBScript
Gear up adminManager = CreateObject("Microsoft.ApplicationHost.WritableAdminManager") adminManager.CommitPath = "MACHINE/WEBROOT/APPHOST" Set anonymousAuthenticationSection = adminManager.GetAdminSection("system.webServer/security/hallmark/anonymousAuthentication", "MACHINE/WEBROOT/APPHOST/Contoso") anonymousAuthenticationSection.Backdrop.Item("enabled").Value = False Gear up windowsAuthenticationSection = adminManager.GetAdminSection("system.webServer/security/authentication/windowsAuthentication", "Automobile/WEBROOT/APPHOST/Contoso") windowsAuthenticationSection.Properties.Detail("enabled").Value = True adminManager.CommitChanges() Source: https://docs.microsoft.com/en-us/iis/configuration/system.webserver/security/authentication/windowsauthentication/
Posted by: pappalardoyouten.blogspot.com
0 Response to "Windows Server 2016 Iis Windows Authentication"
Post a Comment